Tuesday 21 May 2013

Craft fair take two.

Yesterday was my second craft fair, which was nice. 

Good points:

I didn't have the fewest sales out of everyone there.

I made £8

I got a very positive reception 

They didn't charge us for our pitches.


Bad points:

It was very quiet

The woman who called me despicable because I wasn't raising money for charity.

It was very humid outside. I don't like humidity


Like a silly person, I forgot to take pictures. But I sold one of my made from scraps easel cards and the butterfly card from a previous blog along with a lavender bag and a calendar. 

I have orders from Nana for a dozen cards for £25 and Tom from PokSoc has ordered an owl pillow for his girlfriend which should net me about £30 or £35? 

So I'm feeling a lot better than I did after the last one, mostly because the girls on the next stall didn't sell anything at all, I felt really sorry for them as they didn't know that they couldn't sell the food they had brought until they had set up... They still had loads of cheap clothes and jewellery and were doing henna but with it being exams I think everyone was too busy focusing on either studies or drinking :( 

Anyway I'm taking a few days off from serious work, I also have a card order for Sophie to fill (probably £5 for two?) and her jumper to finish so i'll probably focus on that and Nana's cards this week and spend some time just chilling out. 

Also Hunkydory PotW coming on Friday so eeeeeeeeekkk!!! Shopping!!!! 

Crafty hugs! 

Friday 17 May 2013

Lavender bags and "All Aboard"

The last few days I've been busy, cold (our house is perpetually in the shade and as a consequence can feel like subarctic conditions inside while it's t-shirt weather outside) and lacking momentum.

I hate the following things:
Mice. (I live in Hull, they're inevitable) 
Humidity.
Hay fever.
Canola. (Or rapeseed for those of you not in the know) 


Ranting and crusty blindness aside I've not been sat on my backside doing nothing, it kinda feels like I have but I've not. I organised my card making stuff, made some lavender bags and found some inspiration for my "All Aboard" Goody bag.


First project! Lavender bags!

Shopping list:

Purple fabric
Good scissors 
Ribbon
Lace
A sewing machine 
Stuffing (I used stuffing from cheap pillows) 
Dried Lavender 
Buttons


I made two styles, drawstring and danglers (I'm sure there is a technical term) using an old curtain and some lace and ribbon I've had in my stash for about a decade. I, like the total idiot I am didn't measure anything, or take photos as I went along. I just watched 24 Hours in A&E and worked away. I'm sure that there are oodles of tutorials on the Internet that are actually useful. 


Tonight's project: "All Aboard" 

Shopping list: 

DoCrafts Goody bag GDY0313
All Aboard twine and self adhesive reels 
Brown Kraft card blanks (5x7) 
Spellbinders Classic Postage Stamp Edgeabilities 
Dark Blue/navy grosgrain ribbon
More adhesives than I can be bothered mentioning
Red, pale teal, dark blue card for mating and layering (I used Create and Craft Topsy Turvy) 
Small circle die (I used an xcut one, roughly 2/3 of an inch?) 
10mm corner rounder

Note I also use the cover page of the 6x6. You will need that. 


Of course the Christmas tree is still there... To start with I took the card blank and trimmed a strip just over an inch wide from the front to use as envelope embellishments (just cut into roughly envelopy type proportions and draw flaps on) then I took the front page from the pad and trimmed it to just be the image sample section. I matted this up on red card and wrapped ribbon and twine around it (the bow is actually a separate piece tied around which enables the bow to be slid along the length of the twine) I stacked the mini envelopes with 1mm foam pads and tied some more twine around them, placed them as shown and slightly trimmed one of the ticket toppers and placed it inside as an insert.


This one is a bit trickier, or at least it looks it. The only hard part is cutting the strips then die-cutting them so they all come out the same thickness. Three strips from a 6x6 will be enough, just score in the centres of the flat sections and the dips in or if you don't have this die 1.5inch strips scored every 1/4 inch. Fix pieces together appropriately with super sticky tape and cut a small circle from the passport stamp section of the cover piece before mounting on a piece of card to stabilise and stick it in the front. The rest is pretty straight forward. Dimensions are all a bit rough and I didn't write them down and I can't find my ruler... Also it's 11pm and I'm sleepy...


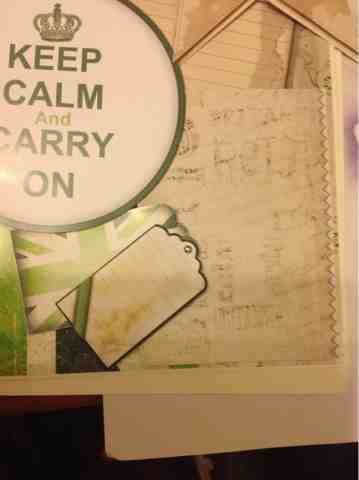
To begin with I used some of the world map decorative tape on the card blank and seen on the front and down the inside. The only hard part of this was trimming the topper down without ruining it so it would still fit inside the envelope... I matted it up after using a corner rounder on some red card before layering it up as shown... I really am bad at talking about the cards I make...


Tomorrow I'm hoping to whip out my Boofle card kits and have some fun. Not that I didn't have fun making these, I just lacked initial inertia... 

Anyway tomorrow is a new day, new projects await me. 

Crafty hugs!  


Tuesday 14 May 2013

Totally on track for today!

This morning started off with a flurry of organisation and housework emptying bins, doing washing up and generally having heads screwed on. Except Matt forgot he had a meeting from half 10 and had to rush out the door the second I got back from Tesco with a loaf of bread....

Anyway it is currently 13:58, I'm blogging and I've finished my silhouette cards! 

Shopping list:

14 count aida/ 28 count evenweave
Black stranded cotton
White stranded cotton (optional)
Seed Beads (optional)
Silhouette cross-stitch pattern

Gold mirri card (I recommend the hunkdory one as it's a nice, less garish gold)
C6 decal edge card blanks
Backing card: antique flowers adorable scorable in burgundy. 
Vintage photo distress ink
Blender tool

Large oval and large scalloped oval Spellbinders dies
Rectangular label die (I used a Xcut large dies die) 


I used a pattern from a vintage inspired pattern book that I got in a magazine at some point. There are many silhouette patterns available on the Internet, or just ask your friends. I have problems with French knots (I just can't seem to get them right!) so I decided to use seed beads instead to add extra interest and glamour. I just used some from a bag of bead waste my friend gave me a while ago, they're easy enough to find on the high street. 

When it came to putting the cards together I decided to keep them very simple, no fuss, just the framed stitching on a nice background card. I chose a burgundy colour with a deep chocolate colour foiling but black goes with anything so you can just run with it.

I cut all the bits out first. When it came to doing the frames I used the inner die as a template (as Spellbinders have a good thick border on them) for trimming the stitching down and attached the stitching to the card frame with PVA glue (red liner tape would also work) then while I waited for the glue to dry I inked up the edges of my cards. I mounted the label shape with PVA glue again (photo glue or double sided tape would also work) before attaching the frames with foam pads. 

Quick, simple, classy. 


Crafty hugs!!


Monday 13 May 2013

Almost there.

With the craft fair a week away I'm setting myself daily tasks for things to produce as a minimum. I'm going to work my hardest but I know that if my health or my duties as a wife and mother get in the way there is no use beating myself up. 

Anyway today I've gotten Sophie's jumper off of the needles and I just need to sew it up. It's been a lot of hard work but I'm very happy with how it has turned out. Just hope I don't mess it all up at the last minute. 

Tomorrow's task list:

Make three silhouette cards. Stitch third silhouette before starting. 

See how long the small lavender motif takes to stitch.

Get on the sewing machine and make some lavender bags. 


Tomorrow's blog post will be a tutorial for the silhouette cards.

Crafty hugs! 

Friday 10 May 2013

Happy chuffing birthday you old bugger

On Tuesday it is my father in laws 50th birthday. I love Chris to bits, he's my best friend, I'd walk over hot coals for him but I will NEVER custom make decoupage for a card for him again....

I spent an hour on my hands and knees with a surgically sharp scalpel cutting out this chuffing tank! Then because the base image is curly the whole card looks squiffy! I'm content enough that he will be over the moon though. It's a tank, with cogs. What could be better?

Shopping list: 

Papermania urban stamp Chronology cogs
Chronology toppers 
Chronology Gears
Chronology 8x8 papers (grey gears and orange cogs and text) 
Dark green (sort of dark sage/military type colour) 
Vintage photo distress ink
Black embossing powder (I have a papermania one) 
Sentiment stamp (I used the Martha Stewart "self-inking stamp designer starter set" to. Create a custom sentiment)  
Rectangular labels dies (I used Xcut Large Dies) 
A4 cream card blank


To begin with I spent about 35 minutes finding all of the correct letters and positioning them on the stamp. This will be easier for most people as I found dyslexia to be a mild hindrance... Then after a few practice stamps I made the final impression on the grey patterned paper. I waited for the ink to dry and cut two matching label shapes (one small and one big) the larger one was sized by the topper I wanted to use as part of the sentiment plaque.

Following this, all hell broke loose. It took me about 55 minutes of swearing, perspiring and shaking to cut out the decoupage. I've never cut out decoupage before, let alone one where I was choosing were to cut and never again 350 gsm... I could have sworn I was just cutting through board... 

Next some fun. I repeatedly stamped my favourite background stamp in vintage photo and threw some black embossing powder at it vaguely before heat embossing to create a textured background paper. 

The rest was a sort of mouse induced rage (I can hear the little buggers scratching and squeaking in my kitchen!!!!!) I used torn paper with inked edges and a layered paper ribbon made from off cuts of the background to frame the tank before mounting up a sentiment for the front. I know it's sideways. I'm just zany like that. I layered up the tank pieces and heaved a sigh of relief. 

Now I need to relax, possibly knit, definitely cry and hope that the mice find the Creme Egg baited in-humane traps. (I'm not ashamed, Hull has a real problem with mice and the council recommend that if you have a recurring mouse problem that you use lethal means of removal. I don't like dealing with dead mice personally but I don't want my daughter wading around in mouse poop so I don't have much choice) 

Some very sleepy crafty hugs x 


Keep calm and carry on.

Today's blog features an unexpected card ordered by my friend Emily for her Dad's retirement from the police. This morning I took delivery of a bunch of kits by My Paper Stash and this one contained the 2012 gents collection including lots of greens and buffs. 

Taking from two sets (not a big deal considering I paid £9 for 64 sets) I created an 8x8 card.

Shopping list:

Papermania 8x8 ivory card blank
Papermania 3mm brads
Red liner tape
Photo glue
Silicone glue
Foam pads
My Paper Stash Gents Papers and Toppers 


The base mats are just butted together rather than overlapped, luckily I completely by chance cut the piece with tea pots the right width for this to work. Then after cutting out some of the toppers out I placed them on with foam pads and glue to create depth the two tags are held together with a brad then fixed on with glue gel and the bunting is layered with foam pads and attached to the string with red liner super sticky tape.

The insert mat is just on the side you traditionally write on and has been left blank so that Emily can fill it out to her hearts content. 

Another 10pm card... I need to stop making a habit out of this...

Crafty hugs!


Wednesday 8 May 2013

Butterflies at 10pm

I've had a card idea sketched out since the weekend but it's hard to heat emboss with a two year old under your feet. Last night Matt had his friend Alex around to play Magic the Gathering and as usual when it came time for Alex to leave they stood at the door talking about Dungeons and Dragons for an hour. I saw this coming and figured "why waste an opportunity!"

So I fished out my clear embossing ink, my powders and some leftover pieces of card.

Shopping list:
Papermania Urban Stamps Butterfly Trio (don't know the actual name, I got it in a goodie bag)
Centura Pearl Ivory (approx 11x7 inches plus several offcut pieces)
Linen cardstock (sage and mulberry)
Clear embossing ink (versamark or other)
Clear and black Papermania embossing powders
Teresa Colins fabrications live love laugh stamp
Other sentiment stamp (I used one from My Mind's Eye's Miss Caroline range)
Paper trimmer
Photo glue
Foam pads
Heat gun

First I took a 12x12 piece of sage green cardstock and started stamping the butterflies randomly attempting to keep spacing even. I stamped and embossed one at a time but it's up to you how you do it. I covered about 7 inches up the page because I wanted to keep some plain for mating and layering.

Then I took a piece of the mulberry (the same I used for the Faerie Poppets card the other day) and stamped and embossed the same butterfly stamp in the black. I actually did this twice but the other set came out much more ... Blurry? Shabby? Vintage? Anyway I coloured the failures in with slate pro markers and dusty concord distress ink and put them away for a later card.

I trimmed an off-cut of centura pearl (from some box making last month) to 11 inches by 7(ish) inches and scored and folded it in half to make the card blank. Using the embossed area of the sage card I cut a large base mat for the card, then after trimming the mulberry piece so it was actually square I cut a mat from the un-embossed sage for underneath.

Using strips of centura pearl and the mulberry card I made two long pennants (makes a change from ribbon) and using other off-cuts I created a layered sentiment and a sentiment for inside.

I then put it all together using 2mm foam pads for dimension.


Anyway this was just a quickie today as I'm a busy bee. Jumper is going well, nearly half way up sleeve two.

Crafty hugs!